Get Free Recharge Through Sending Free SMS

We usually use FREE SMS services like Way2Sms, 160by2 to message our friends so that we save money by providing SMS packs.

Few days ago I came across a website known as Ultoo.com which provide free SMS service across Indian just like free sms websites which I described above but the exclusive factor about Ultoo.com is that they compensate us with FREE RECHARGE for just using their service to written text our friends and relate our from to their service.

Here is the improvements of Ultoo-

  • Get Rs. 2 for creating new account
  • Get Rs. 1 for every referrence
  • Get 2 paisa for every sms you deliver using their service
  • Less Minimum redeem amount (Rs. 10)

Just like the cash which has two factors they have few disadvantages too.Here is the record of disadvantages I discovered on that website.

  • You cannot deliver group SMS
  • They may deliver you ads through sms
Join ULTOO today and start earning.

HTC Droid DNA Smart Phone Review


The Droid DNA by HTC is a big cellphone with a long name. Droid is Verizon's product, but HTC has designed a smooth looking device with desirable specifications and a huge high-resolution display.

It also operates Android 4.1: Jelly Bean, making it the second HTC cellphone to release with this edition of the Android operating system, next to the HTC One X+.

It's big, highly effective and packed with appropriate software, and even cost to shift. The Droid DNA is only $199 with new Verizon contract. Not bad for a product new quad-core system.

In inclusion to the Droid's excellent looks, it has the amazing display and snappy camera HTC mobile phones are known for. Unfortunately, its also got some of the HTC turn-offs, like a shut body without microSD assistance, just 16GB of storage area inside, and an assortment power that often fought to make it through the day.

A few issues aside, we're ready to say that there's still a lot to love about the Droid DNA. With butt-kicking components, a knockout screen, fast Verizon service and a awesome price, it's a very excellent cellphone on a solid carrier. Still, it's a bad to see a system with such meaty specifications come up short of true success.

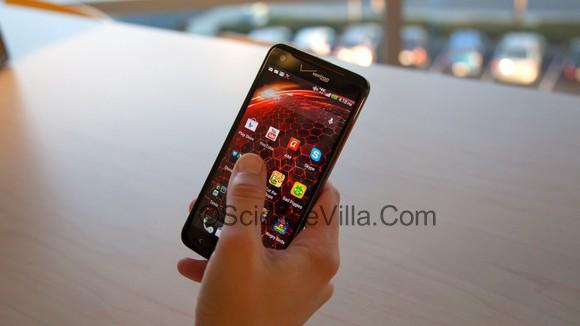
Remember when a little cellphone signified a top quality handset? Well the Droid DNA verifies that those times are over - for now, at least. Calculating in at 5.6-inches high and 2.7-inches extensive, the DNA is a actual best fo a device.

It's tall and relatively thin, measuring 0.38-inches at its thickest. That makes it a little bit heavier than a New samsung Galaxy S3 or ellow Verizon exclusive the Droid Razr HD, but you really need to go part by part to tell.


The Droid DNA is a big boy, but there's not really any wasted area. This cellphone features a huge 5-inch display. For genuine visible property, it sides out the Galaxy S3 and the Droid Razr HD, both of which come in at 4.8 and 4.7-inches display respectively.

The display is designed with Gorilla glass, as is nearly every cellphone on the market nowadays. However, the Droid DNA has no frame covered around the edge of its display. Instead, the display units and shapes at the sides, conference the framework to type a particularly smooth-featured system.

Below that monolithic extremely LCD3 display are three capacitive Droid buttons: Back, Home and Recent Apps. Each provides light, springy haptic feedback when touched.


Aesthetically, the Droid DNA looks somewhat sci-fi. With its matte black finish and red, aerated racing stripes, it wouldn't look out of place on the helm of the "Prometheus," or poking out of Noomi Rapace's space suit.


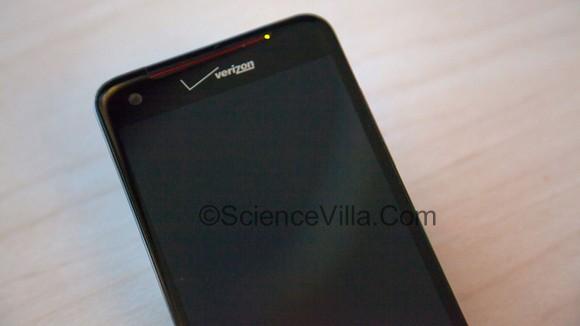
That red range look expands to the main contact presenter at the top. Inset within that there's a little mild that shines when the cellphone is asking for. This is handier than you'd think, since the Droid DNA facilitates wi-fi asking for. It works as a awesome verification that the cellphone is getting juice without having to awaken the display.


To the left of the call speaker is a circular notification light, which glows orange. To the right of that is a Verizon logo. The DNA, like all Droid phones, is exclusive to Verizon.

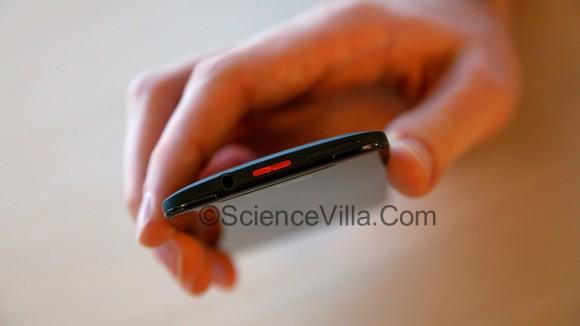
At the very top of the device you'll look for the conventional earphone port and a red Sleep/Wake key. There's also a micro-SIM card port up there.


On the right part is a bright red amount musician. The remaining functions nothing but a steel red range.

The overall development of the Droid DNA is very sleek and glassy. It definitely has a top quality think will entice anyone converted off by the more plastic-feeling mobile phones (ahem, Galaxy S3). It preserves a very limited information thanks to its submerged Sleep/Wake key and amount musician.

However, the changes on the Droid DNA are so cleanse they can be a bit of work to discover and media. To function them, we required a better hold on the DNA than on other mobile phones with more noticeable functions.

Though this is not a slick device, thanks to a soft-touch thermoplastic assistance. This is the DNA at its most HTC-tastic, with a experience that's similar to the HTC One X, One X+ and Windows Phone 8X, other mobile phones from the self-proclaimed "Quietly Brilliant" product.

As is the case with many HTC mobile phones, it's a completely enclosed style. That indicates no detachable battery or microSD slot. This is a bit of problem, since internal storage area is only 16GB.

Also on the back are the essential still and video lenses, the first of which is ringed in the DNA's trademark red steel. There's also a back alert mild, something we've never seen before. Invisible within the dark complete, it's only noticeable when it shines lemon to let you know you've skipped a written text, e-mail or call.


There's also marketing for Dr. Dre's Surpasses Audio. It statements enhanced audio performance for headsets, and the sound is certainly better with it triggered, but we're not sure it does any better than the iPhone 5's equalizer.

Dre's Surpasses do nothing for the cell phone's exterior presenter, which is discovered low on the DNA's rear, and is a lot noisy anyway.

While that rubbery back hold indicates the Droid DNA won't go traveling out of your side too quickly, there is the bigger problem of the cell phone's large dimension. Even those with big arms may fight function with just five numbers. When securing the cellphone, we often discovered ourselves expecting the DNA on the end with one side while we shut it with the other, and we have fairly big arms.

The dimension this device is certainly not a bad choice on the part of HTC, it just comes down to personal choice and what you want out of a cellphone. If you want a smart phone designed for media intake plus web surfing around and squint-free studying, the DNA should be on your mouth. If you want a system that suits quickly in the hand, that you can pop in a wallet and ignore about, maybe go down a few inches extensive.

Specification: 


Operating System:          Android™ 4.1 (Jelly Bean) with HTC Sense™
Processor:                       Qualcomm® APQ8064 Quad-core 1.5 GHz, MDM9615M
Memory:                         16 GB, 2 GB RAM
Network:                         CDMA: 800/1900MHz; UMTS/HSPA: 850/900/1900/2100MHz;
                                        GSM/GPRS/EDGE: 850/900/1800/1900MHz; LTE 700 MHz
                                        (Band 13)
Camera:                          8 MP main camera with auto focus, LED Flash, BSI sensor,
                                         f/2.0 aperture, 28mm lens, 1080p HD video recording, w/
                                         HTC ImageSense®: 2.1 MP front-facing camera,
                                         Dedicated HTC ImageChip®
Keyboard:                        Form FactorVirtual QWERTY
Display:                            5-inch super LCD3, HD 1080p, Gorilla® Glass 2
Special Features:              Beats Audio® built in, HTC ImageSense®, Dedicated HTC
                                          ImageChip®
Battery:                            2020 mAh LI-ION (embedded)
Dimensions:                      141 x 70.5 x 9.73 mm
Weight:                             140 g

HTML Java Script For Social Sharing Button


So friends today I will introduced a set of subscribe buttons that you can use in your blogger or wordpress platforms weblog without any type of issue, so you just need to add some set of requirements and you will be prepared for displaying your social link with these glossy icons. So now these icons consist of no JavaScript for float cruising impact but it’s the miracle of the CSS so it will not take whenever for running out these ones.

The guidelines offered below are for blogger blogs but these works in wordpress platforms so you can insert the CSS in one position and value in another as you normally do with all your devices. So I will not display any instruction’s for wordpress platforms weblogs.

  • Go to Blogger > Template > Edit HTML.
  • Press Ctrl + F and look for for ]]> and paste below CSS above it.

.bubblewrap{
list-style-type:none;
margin:0;
padding:0;
}
.bubblewrap li{
display:inline;
width: 60px;
height:60px;
}
.bubblewrap li img{
width: 50px; /* width of each image.*/
height: 50px; /* height of each image.*/
border:0;
margin-right: 4px; /*spacing between each image*/
-webkit-transition:-webkit-transform 0.1s ease-in; /*animate transform property */
-o-transition:-o-transform 0.1s ease-in; /*animate transform property in Opera */
}
.bubblewrap li img:hover{
-moz-transform:scale(1.8); /*scale up image 1.8x*/
-webkit-transform:scale(1.8);
-o-transform:scale(1.8);
}

  • Now just save template.
  • Now navigate to Blogger > Layout > Add Gadget.
  • Choose HTML/JavaScript and add below value into it.

<ul class="bubblewrap">
<li><a href="https://plus.google.com/u/0/xxxxxxxxxxxxxx" target='_blank' rel='nofollow'><img src="http://1.bp.blogspot.com/-nShwpxKs2QA/UM3BUKd-jQI/AAAAAAAAF8w/T8BjuWllJVU/s1600/bloggertrix-google-icon.png" title="Add to Facebook" /></a></li>
<li><a href="http://www.facebook.com/xxxxxxxxxxxxxx" target='_blank' rel='nofollow'><img src="http://3.bp.blogspot.com/-DdXKgR250PU/UM3BS3Gtb2I/AAAAAAAAF8o/-n7bz_hTfmY/s1600/bloggertrix-facebook-icon.png" title="Add to Facebook" /></a></li>
<li><a href="http://www.digg.com/xxxxxxxxxxxxxx" target='_blank' rel='nofollow'><img src="http://2.bp.blogspot.com/-_LSlpWoIO58/UM3BRsSj0vI/AAAAAAAAF8g/oOWj0xC9aF4/s1600/bloggertrix-digg-icon.png" title="Add to Digg" /></a></li>
<li><a href="http://www.twitter/xxxxxxxxxxxxxx" target='_blank' rel='nofollow'><img src="http://1.bp.blogspot.com/-hKDGv3m-OVQ/UM3BX36PaqI/AAAAAAAAF9E/lXpT5Mdvx1I/s1600/bloggertrix-twitter-icon.png" title="Add to Twitter" /></a></li>
<li><a href=http://feeds.feedburner.com/xxxxxxxxxxxxxx target='_blank' rel='nofollow'><img src="http://1.bp.blogspot.com/-WXrH-N_sH4s/UM3BW3OE2eI/AAAAAAAAF9A/mVaMVGHmpXk/s1600/bloggertrix-rss-icon.png" title="Add RSS Feed" /></a></li>
</ul>


  • Now just modify the red xxxxxxxxxxxxxx with your own personal website usernames, that is it now appreciate people have fun using these discussing control buttons.

How To Auto Arranged Your Blogger Photos Into Full Size


Post design is always the significant key to great viewers, how you add written text, pictures and video clips to your content really issues, their dimension, shades and everything relies on your imagination. So the one factor you can do is to get your pictures in high excellent so that when ever a personal comes to analysis your content he should be meets with you post design so I have posted on how you can create your picture fit to your blog’s dimension using CSS, so using this css technique you can instantly create every picture fir in your blog’s dimension so if the picture is too large than your blog’s dimension it will be still kept in the advantage while keeping its overall measurements.

But many persons asked for me that if I can offer them with some program that can instantly create every picture fit to weblog dimension even if its little dimension and size, well I just discovered a program that can do exactly what you are looking for out. With this program included to your website every newest and mature content pictures will get 100% weblogs dimension that indicates automated picture resizing to the advantage, so if you have some small pictures then they will also get extended to the 100% + every picture will get caption in their bottom with the alt written text you will add in them.

  • Open Blogger > Template > Edit HTML
  • Now press CTRL + F and find for and paste below code above it.

<script src='http://ajax.googleapis.com/ajax/libs/jquery/1/jquery.min.js' type='text/javascript'/>
<script type='text/javascript'>//<![CDATA[ $(document).ready(function(){ var areawidth = $('#Blog1').width();

//$('.sidebar').find('.clear').each(function(n, layer){ //var layer = $(layer);
//if (layer.css('clear') == "both") layer.css('clear','none');
//});
$('#Blog1').find('div').each(function(n, layer){ var layer = $(layer);
if (layer.css('clear') == "both") layer.css('clear','none');
});

$('.post-body').find('img').each(function(n, image){ var image = $(image);
alt = image.attr('alt');
id = image.index();
imageAltId = 'imagealt'+n;
var originalWidth = image.width();
var originalHeight = image.height();
image.attr({src : image.attr('src').replace(/s\B\d{3,4}/,'s' + 1200)});
image.attr('width',areawidth);
//var newHeight = (originalHeight/originalWidth * areawidth).toFixed(0);
image.attr('height','auto');
image.css('height','auto').css('float','none').css('margin','0');
image.parent().css('margin-left',0).css('margin-right',0).css('margin-top',0).css('margin-bottom',0);
image.parent().addClass('postImage');
image.parent().parent().css('clear','none');
if (alt) {
image.after($('<div>').css('padding','5px 5px 8px 5px').css('background-color','#ffffff').css('opacity','0.6').css('filter','alpha(opacity=60)').attr('id',imageAltId).text(alt));
var divHeight = $('#'+imageAltId).height() + 13;
$('#'+imageAltId).css('margin-top','-'+divHeight+'px');
}
});

});

// the following values are in milliseconds
var speedOut = 2200;
var speedIn = 2200;
var pauseShow = 6000;

function goSlideshow(imageDestination, captionDestination, picasaEmail, picasaAlbum, picasaResults, picasaDimension){
var url = 'http://picasaweb.google.com/data/feed/api/user/' + picasaEmail + '/album/' + picasaAlbum + '?kind=photo&imgmax=' + picasaDimension + '&max-results=' + picasaResults + '&alt=json';
($.getJSON(url, 'callback=?')).success(function(data){
var slides = new Array();
var captions = new Array();
var heights = new Array();
var widths = new Array();

$(data.feed.entry).each(function(i, entry){
slides[i] = entry.content.src;
captions[i] = entry.summary.$t;
heights[i] = entry.gphoto$height.$t;
widths[i] = entry.gphoto$width.$t;
});

if(slides){
var urlValue = 'url(' + slides[0] + ')';
if (heights[0] > widths[0]){
$(imageDestination).css('background-size','auto 100%');
} else $(imageDestination).css('background-size','100% auto');
$(captionDestination).text(captions[0]);
$(imageDestination).css('background-image',urlValue);
var counter = 1;

window.setInterval(function(){
if (counter >= slides.length) counter = 0;
$(imageDestination).fadeOut(speedOut,function(){
var urlValue = 'url(' + slides[counter] + ')';
$(imageDestination).css('background-image',urlValue);
$(captionDestination).text(captions[counter]);
if (heights[counter] > widths[counter]){
$(imageDestination).css('background-size','auto 100%');
} else $(imageDestination).css('background-size','100% auto');
$(imageDestination).fadeIn(speedIn);
counter++;
}
);
},pauseShow);
}
}).error(function(data){
console.log('error getting feed data');
});
}
//]]></script>


  • Now if you have the red range revealing the jquery already in your website than there is no need to add it again so you can eliminate that range and then Preserve the Design.
  • Now renew your website and see that every picture in your websites will be resized to complete blog’s dimension even if it is little in dimension.

REMEMBER Using this program on your blogger weblog can create your picture unclear as resizing them looses their overall excellent but still if you need to re-size every picture in your website to 100% that this is the greatest remedy.

Windows Vs Android


Windows Mobile and Android are two smart phone operating-system that are quite popular these days for very different reasons. Windows Mobile, from Microsoft, is a very recognized operating system that has been around for a significant time frame. It’s a tried and examined operating-system that people are quite familiar with and know how to function. Google presented their operating system rather lately and as such, it is still in its beginnings and is affected with a lot of uncertainty that is being resolved.

The most major difference between these two is in the certification. Where Windows Mobile is a exclusive application that components producers need to pay for, Android is free that uses Linux system at its primary. The Android’s certification also allows other organizations to create application for Android without launching their own resource, allowing them to keep their variations within their own line of mobile phones. Google does sell some programs that come with the operating system, and it is the only way for them to generate income out of it.


Because of the gap in adulthood of the two, there is a extensive edge in terms of business. Windows Mobile is set up in a extensive range of mobile phones from a lot of producers. Google’s Android managing program is many types of mobile phones at the moment. The same is also true when it comes to third party application. There are a lot more application that can be bought for Windows Mobile in comparison to Android.

Although, for the meanwhile, you can only get devices that have a specific operating system set up, there might come an occasion when you would be permitted to choose which one you want with the model you like. Google’s Android might be the underdog for now but there is a very real probability that it would become a competitor. Especially when you consider the huge group that are often established around free.

Summary:

  1. Windows Mobile is from Microsoft while Android was developed by Google
  2. Windows Mobile is exclusive while Android is open source.
  3. Windows Mobile is relatively old and fairly recognized while the Android is fairly new
  4. There are a lot of mobile phones that uses Windows Mobile while there are 70% operating Android
  5. There are a lot more programs available for Windows Mobile in comparison to Android

How To Create Super Hidden Folder In Windows Using Command Prompt


Almost anyone knows how to create a “hidden” folder in Windows, but then again almost anyone knows how to create explorer show invisible folder. Let us take a look at how to create a folder so invisible, only you will know its there.

Anyone that has used Windows for a while knows that they can right-click on a file or folder and modify its qualities, more so its features to create it a so called “hidden” file or folder. The problem is that just as many individuals know you can show information and information that have the “hidden” feature by simply changing a radio key under the folder view options. The most convenient way to create a real invisible file or folder is to mark it as an important operating system file, that way Windows will never show it even if explorer is set to show invisible file and folder.

To do this we need to launch a command prompt, so press the Win + R key and type cmd then hit the enter key.


Now we are going to use the attrib command, so go ahead and type:


attrib +s +h “C:\Users\Taylor Gibb\Desktop\Top Secret”

You will need to substitute the stuff in the inverted comma’s to an absolute path of a folder or file on your program that you want to create invisible.


Now if I go look for the Top Secret folder on my Pc it is gone, even with explorer set to demonstrate invisible file and folder.


To unhide the file or folder you can run the same control, except this time use “-“ instead of the “+” signs.


attrib -s -h “C:\Users\Taylor Gibb\Desktop\Top Secret”


Like miracle, my folder showed up again.


Warning:


While this method will catch 99% of individuals, if I realized for a fact that there was a invisible folder on a program that I was looking for there are many ways that will present the folder. The most convenient would be to create explorer show operating system files, which can be done through the same user interface as displaying invisible files.


Although any common user who unchecks the box will most probably be terrified off by the caution message that appears.


I thing you might like this. If there is any problem to access comment in below.

How To Create Visual Hard Drive ( VHD )


Virtualization has become an incredibly powerful and versatile way to set up environment. So much in fact that Microsoft has incorporated the ability to connect virtual hard drive (VHD) files as physical drives in the Microsoft windows Drive Management tool. This process is easy enough to do personally but if you connect VHD files often then we have a solution which enables you to install and unmount VHD files with single click.


Simply add our Mount VHD and Unmount VHD programs to your Deliver To selection.


Now whenever you right click a VHD computer file, go to the Deliver To > Mount VHD control. Note: This action will require manager rights, you may receive a UAC elevated authorization instant.


After the program has run, the VHD is available in Disk Managment and Microsoft windows Explorer and can be utilized just like a physical disk drive.


When you are finished using the VHD, basically unmount it by right click the VHD computer file and going Deliver To > Unmount VHD.

Mount VHD Script:


@ECHO OFF
TITLE Mount VHD
ECHO Mount VHD
ECHO Written by: Jason Faulkner
ECHO SysadminGeek.com
ECHO.
ECHO.

SETLOCAL

SET DiskPartScript="%TEMP%DiskpartScript.txt"

ECHO SELECT VDISK FILE="%~1" > %DiskPartScript%
ECHO ATTACH VDISK >> %DiskPartScript%

DiskPart /s %DiskPartScript%

ENDLOCAL

Unmount VHD Script:


@ECHO OFF
TITLE Unmount VHD
ECHO Unmount VHD
ECHO Written by: Jason Faulkner
ECHO SysadminGeek.com
ECHO.
ECHO.

SETLOCAL

SET DiskPartScript="%TEMP%DiskpartScript.txt"

ECHO SELECT VDISK FILE="%~1" > %DiskPartScript%
ECHO DETACH VDISK >> %DiskPartScript%

DiskPart /s %DiskPartScript%

ENDLOCAL


Download Link Of  VHD Script